

How To Install A Nuget Package Manually
This browser is no longer supported.
Upgrade to Microsoft Edge to take advantage of the latest features, security updates, and technical support.
Install and manage packages with the Package Managing director Console in Visual Studio (PowerShell)
The NuGet Package Managing director Console lets you utilize NuGet PowerShell commands to find, install, uninstall, and update NuGet packages. Using the console is necessary in cases where the Package Director UI does non provide a way to perform an operation. To apply nuget.exe CLI commands in the console, come across Using the nuget.exe CLI in the console.
The console is congenital into Visual Studio on Windows. It is non included with Visual Studio for Mac or Visual Studio Lawmaking.
Important
The commands listed here are specific to the Package Manager Console in Visual Studio, and differ from the Package Management module commands that are available in a full general PowerShell environs. Specifically, each environment has commands that are non available in the other, and commands with the same proper name may as well differ in their specific arguments. When using the Parcel Management Console in Visual Studio, the commands and arguments documented in this present topic utilise.
Detect and install a parcel
For example, finding and installing a parcel is washed with three piece of cake steps:
-
Open the project/solution in Visual Studio, and open the console using the Tools > NuGet Package Manager > Packet Director Console command.
-
Find the package yous want to install. If you already know this, skip to pace 3.
# Find packages containing the keyword "elmah" Find-Packet elmah -
Run the install command:
# Install the Elmah package to the project named MyProject. Install-Packet Elmah -ProjectName MyProject
Important
All operations that are available in the panel can also exist done with the NuGet CLI. However, console commands operate within the context of Visual Studio and a saved project/solution and often attain more than their equivalent CLI commands. For example, installing a package through the console adds a reference to the project whereas the CLI command does not. For this reason, developers working in Visual Studio typically adopt using the console to the CLI.
Tip
Many console operations depend on having a solution opened in Visual Studio with a known path name. If you have an unsaved solution, or no solution, you lot can run into the mistake, "Solution is not opened or not saved. Please ensure you have an open and saved solution." This indicates that the console cannot determine the solution folder. Saving an unsaved solution, or creating and saving a solution if you lot don't have one open, should correct the error.
Opening the console and console controls
-
Open up the panel in Visual Studio using the Tools > NuGet Parcel Manager > Package Director Console command. The console is a Visual Studio window that tin can be arranged and positioned yet you like (run into Customize window layouts in Visual Studio).
-
By default, console commands operate confronting a specific package source and project as set in the control at the tiptop of the window:

-
Selecting a different packet source and/or project changes those defaults for subsequent commands. To overrride these settings without irresolute the defaults, most commands support
-Sourceand-ProjectNameoptions. -
To manage package sources, select the gear icon. This is a shortcut to the Tools > Options > NuGet Packet Managing director > Package Sources dialog box equally described on the Parcel Managing director UI folio. Likewise, the control to the right of the project selector clears the console'southward contents:

-
The rightmost push interrupts a long-running command. For example, running
Get-Packet -ListAvailable -PageSize 500lists the top 500 packages on the default source (such every bit nuget.org), which could take several minutes to run.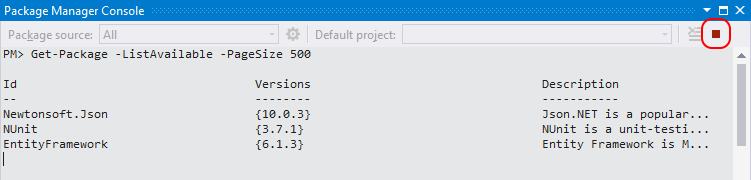
Install a package
# Add together the Elmah parcel to the default project as specified in the console's project selector Install-Bundle Elmah # Add the Elmah bundle to a project named UtilitiesLib that is not the default Install-Package Elmah -ProjectName UtilitiesLib Meet Install-Package.
Installing a package in the console performs the same steps as described on What happens when a package is installed, with the post-obit additions:
- The Console displays applicable license terms in its window with implied agreement. If yous do not agree to the terms, you lot should uninstall the package immediately.
- Also a reference to the package is added to the project file and appears in Solution Explorer nether the References node, you need to save the projection to run across the changes in the project file directly.
Uninstall a package
# Uninstalls the Elmah package from the default project Uninstall-Package Elmah # Uninstalls the Elmah packet and all its unused dependencies Uninstall-Package Elmah -RemoveDependencies # Uninstalls the Elmah package fifty-fifty if another package depends on information technology Uninstall-Package Elmah -Force Encounter Uninstall-Package. Utilize Get-Parcel to see all packages currently installed in the default project if you lot need to discover an identifier.
Uninstalling a parcel performs the post-obit actions:
- Removes references to the package from the projection (and whatever management format is in use). References no longer announced in Solution Explorer. (Y'all might need to rebuild the project to see it removed from the Bin binder.)
- Reverses any changes made to
app.configorweb.configwhen the package was installed. - Removes previously-installed dependencies if no remaining packages utilise those dependencies.
Update a packet
# Checks if there are newer versions available for any installed packages Go-Packet -updates # Updates a specific package using its identifier, in this case jQuery Update-Package jQuery # Update all packages in the project named MyProject (equally it appears in Solution Explorer) Update-Package -ProjectName MyProject # Update all packages in the solution Update-Package Run into Become-Package and Update-Parcel
Discover a package
# Notice packages containing keywords Notice-Parcel elmah Observe-Package logging # List packages whose ID begins with Elmah Find-Package Elmah -StartWith # By default, Get-Bundle returns a list of 20 packages; use -Kickoff to show more Observe-Bundle logging -Starting time 100 # List all versions of the bundle with the ID of "jquery" Find-Parcel jquery -AllVersions -ExactMatch See Observe-Package. In Visual Studio 2022 and earlier, use Become-Bundle instead.
Availability of the console
Starting in Visual Studio 2022, NuGet and the NuGet Parcel Managing director are automatically installed when yous select whatever .Internet-related workloads; y'all can also install it individually by checking the Individual components > Lawmaking tools > NuGet package manager choice in the Visual Studio installer.
Also, if you're missing the NuGet Parcel Manager in Visual Studio 2022 and earlier, check Tools > Extensions and Updates... and search for the NuGet Parcel Director extension. If yous're unable to use the extensions installer in Visual Studio, you can download the extension direct from https://dist.nuget.org/index.html.
The Packet Manager Console is not presently available with Visual Studio for Mac. The equivalent commands, however, are available through the NuGet CLI. Visual Studio for Mac does have a UI for managing NuGet packages. See Including a NuGet package in your project.
The Parcel Manager Console is non included with Visual Studio Code.
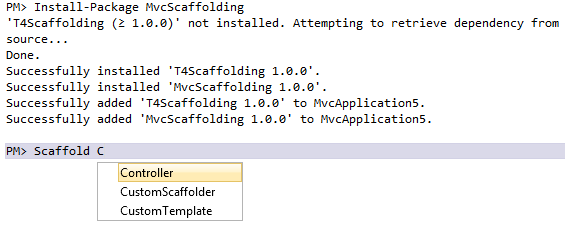
Extend the Package Manager Console
Some packages install new commands for the console. For example, MvcScaffolding creates commands similar Scaffold shown below, which generates ASP.Net MVC controllers and views:
Ready a NuGet PowerShell profile
A PowerShell contour lets you make commonly-used commands available wherever you utilize PowerShell. NuGet supports a NuGet-specific profile typically constitute at the following location:
%UserProfile%\Documents\WindowsPowerShell\NuGet_profile.ps1
To observe the contour, type $profile in the console:
$contour C:\Users\<user>\Documents\WindowsPowerShell\NuGet_profile.ps1 For more details, refer to Windows PowerShell Profiles.
Apply the nuget.exe CLI in the console
To brand the nuget.exe CLI bachelor in the Package Manager Console, install the NuGet.CommandLine package from the console:
# Other versions are available, see https://www.nuget.org/packages/NuGet.CommandLine/ Install-Packet NuGet.CommandLine -Version 4.4.1 Feedback
Submit and view feedback for

Source: https://docs.microsoft.com/en-us/nuget/consume-packages/install-use-packages-powershell
Posted by: simonsdoetianighim.blogspot.com
0 Response to "How To Install A Nuget Package Manually"
Post a Comment