

How To Install An Outside Garden Tap
How to Install a Frost-Proof Outdoor Faucet
This cheap faucet can save thousands in water damage—and forbid water contamination
![]() Time
Time
A full day
![]() Complication
Complication
Beginner
![]() Cost
Cost
$51–100
Introduction
Frost-proof, anti-siphon sill erect faucets prevent winter h2o-line freeze-ups and end unsanitary water from contaminating the water system. Hither's how to install one in your house.
Tools Required
Materials Required
- Anti-siphon sill erect
- Copper fittings
- Copper pipe
- Dielectric fitting (optional)
- Flux
- Lead-complimentary solder
- Pipe hangers
- Piping tape
- Shutoff
- Silicone caulk
Overview: How to install a frost-proof outdoor faucet
In contempo years, outdoor water faucets (sill cocks) and a water spigot have undergone two great improvements:
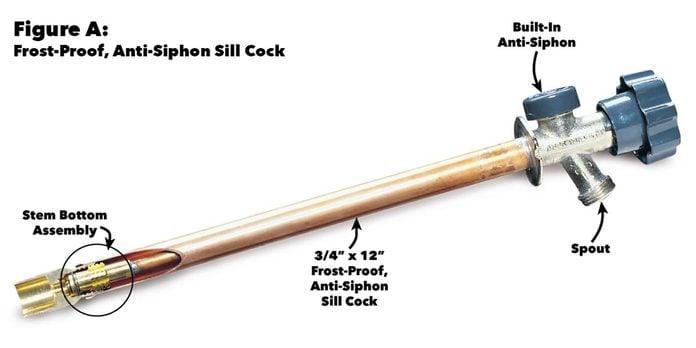
- First, a frost-proof sill cock (Figure A, below) puts the faucet'southward flow valve well within the heated walls of your home. That ways if a sudden freeze occurs or you forget to shut down and bleed the water spigot water line for the wintertime, your chances of having a pipe outburst drop dramatically.
- Second, an anti-siphon device (vacuum breaker in a h2o spigot), now required by all building codes, is built into some new sill cocks (or can exist added on to existing ones; step 11). It prevents unsanitary h2o from being pulled back through a garden hose and contaminating your water organisation.
We'll show you how to install freeze-proof sill cocks on an outdoor water faucet, anti-siphon valves and shutoff valves that volition safeguard your home. The work will include connecting new fittings or soldering (also called "sweating") copper joints. Plus, save money past doing simple plumbing repairs yourself. These fixes are completely DIY with basic tools and skills.
Notation: Our home has a galvanized pipe system. The parts and installation techniques shown in the step-past-footstep photos are the same for copper plumbing. If y'all have a CPVC plastic system, however, the parts will expect like to those shown in Figure B (below).
Project stride-by-pace (13)
Step 1
Call first for local plumbing rules
When you upgrade a sill erect, telephone call your plumbing inspector to bank check on local requirements. (You may need a allow, too.) Although plumbing codes and enforcement vary effectually the state, generally they crave:
- Three-quarter inch (minimum) inside bore supply pipes to each sill cock. Some local codes but require one/two-in. pipe and a 1/2-in. sill erect.
- Either an canonical vacuum breaker that permanently attaches to standard sill cocks (step 11) or a sill cock with the feature built in (step 7) to preclude siphoning.
- A shutoff valve, also chosen a "stop" valve, to serve each sill erect. Our code required u.s.a. to install a shutoff with a born drain known equally a "stop and waste" valve (Figure B, below).
- If y'all have galvanized steel pipe and must make a transition to copper, install a special dielectric plumbing equipment (step 8) to prevent corrosion.
Step ii
Freeze-Proof Strategy
The frost-proof feature works by shutting off water period back at the stalk bottom (inside a heated space). The anti-siphon feature is built into the water spigot. Install the sill erect through a wall with a slight down pitch to allow whatsoever remaining water to drain out through the h2o spigot.
If your domicile is built on a slab:
If your house is built on a concrete slab, a frost-proof sill cock won't work in most cases. Instead, connect a standard sill cock that's fitted with a vacuum breaker. If freezing is a concern, install a "cease and waste matter" valve on the pipe every bit close to the sill cock every bit possible (yet inside a heated area).
Build in an admission panel so you tin can readily open up and close the valve. In the winter, to avoid having your sill cock and pipes freeze, close the shutoff valve, uncap its drain to permit air to enter, and open up the sill cock to permit any h2o run out. Don't modify these fixture settings until warmer conditions permits using the sill cock again.
![]()
Pace iii
Make a sketch and a parts listing

Measure your existing plumbing and list the inside diameter of the existing piping, the thickness of the exterior wall, the linear anxiety of new piping and the types of fittings needed.
Draw where each pipe and fitting goes; betoken whether a part has threaded, sweat or solvent-welded joints; and label its size and description (for example, three/four-in. copper female adapter). Then sketch the new plumbing layout to use for a materials listing.
Step iv
Make a shopping list
If you accept galvanized pipage, we recommend you lot unscrew the pipe back at the first coupling or fitting (steps 3 – 6). Then insert a dielectric plumbing equipment (step 8) and catechumen to copper pipe and fittings all the manner back through to the sill cock.
Frost-proof, anti-siphon sill cocks are bachelor in ane/2-in. and 3/4-in. inside diameters, and viii-in., 10-in. and 12-in. lengths (step vii). Choose the diameter required by your local code and a length that will conform the thickness of your exterior wall plus requite y'all some working room within to attach pipe and fittings.
We besides installed a 3/4-in. "total-port" (for unobstructed water flow) ball valve with drain. There's no neoprene washer to article of clothing out, and the easy-to-turn handle shows whether the valve is open up or airtight (footstep 9).
Step v
Putting information technology all together: Remove the former water spigot
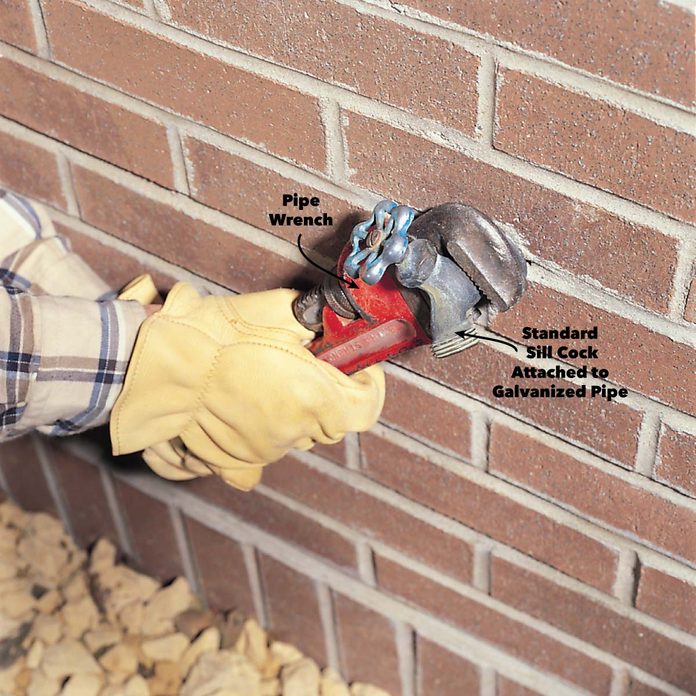
Turn off either the water shutoff valve to the existing sill cock or the main water supply. Open the sill cock and drain the water from the line. Remove the erstwhile outdoor h2o faucet sill cock by positioning a pipe wrench at the back of the sill cock and turning the wrench counterclockwise. Have an banana use a piping wrench to concord back the sill cock supply line inside to foreclose sections of piping from unscrewing.
Step 6
Turn off the next pipe

Unscrew the old piping at the articulation closest to the outside wall. Hold one side stationary with one pipage wrench and twist off the pipe with the other. Remove as many couplings and pipes as needed to fit in the new assembly (step 8).
Stride 7
Insert the new sill cock
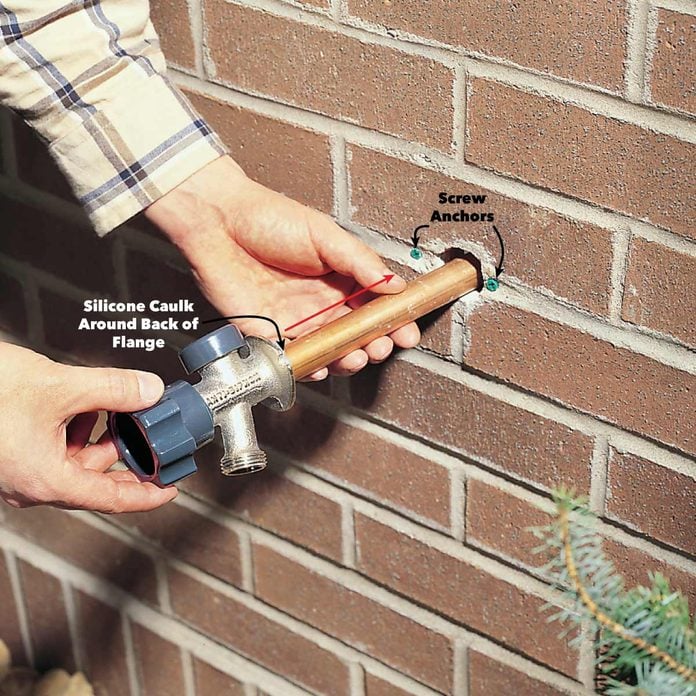
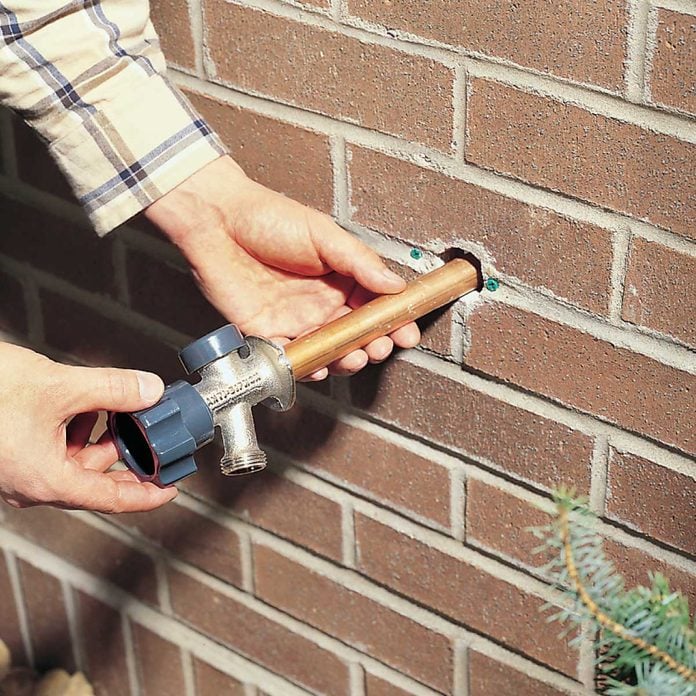
Diameter a i-1/8 in. hole (if the hole needs enlarging) for the new sill cock using a masonry hole saw. Dry-fit the sill cock in an upright position tight confronting the wall and mark the location of the fastening holes. Drill two 1/4-in. holes with a masonry drill bit and push the plastic screw anchors in affluent to the wall. Apply a thick bead of clear silicone around the back of the sill cock flange, push it against the wall and spike it with two ane-one/4 in. No. 8 roundhead contumely screws.
Step 8
Adhere the dielectric fitting
Start from the old pipe end and work toward the new sill cock. Information technology's easier to solder copper fittings to copper pipe and then screw them into hard-to-sweat parts like the brawl valve and sill erect.
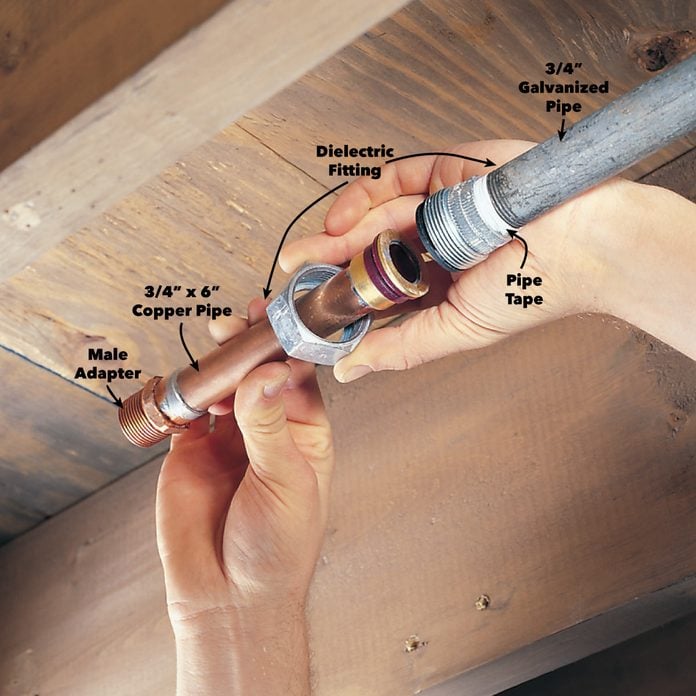
Disassemble the dielectric fitting and solder one end to a 6-in. copper piping. Cool the pipe and reassemble the plumbing fixtures. Then solder the copper male adapter to the other stop. Use pipage tape to the threads of the galvanized pipe and tightly screw the dielectric plumbing equipment to the pipe.
Step 9
Assemble the pipe and fittings
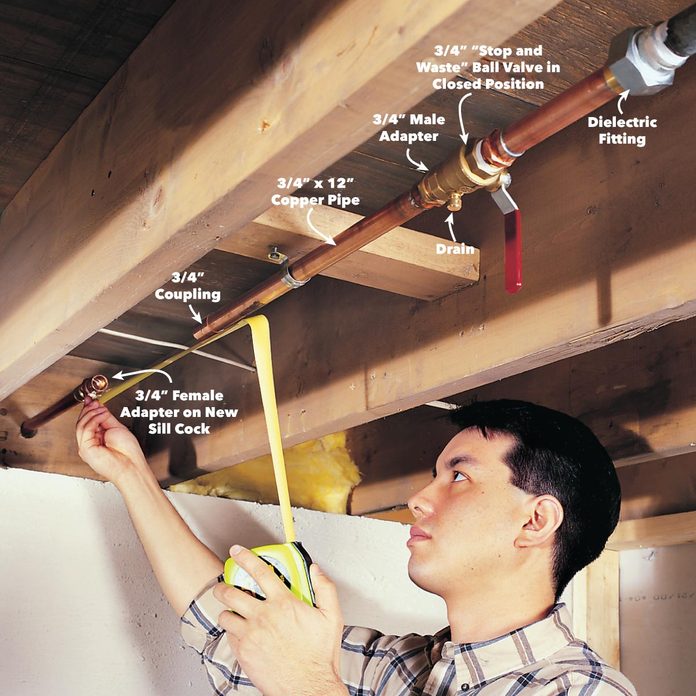
Utilise pipe tape to the male adapter threads on the 6-in. pipe (shown in the previous step), and screw the "stop and waste" ball valve to it. The h2o flow management arrow on the valve must point toward the sill erect. Solder a male person adapter to a 12-in. copper piping, use piping tape to the adapter threads and screw it into the other side of the ball valve. Temporarily screw a female adapter to the sill cock and slide a female coupling halfway onto the end of the 12-in. pipe. And then measure the distance betwixt them, add 1 in. and cut a section of 3/four-in. copper pipe to fit.
Footstep ten
Sweat the copper

Solder on the three/4-in. coupling final. Remove the female person adapter and solder information technology to the copper pipe. Then apply pipe record to the male threads, and screw the adapter onto the sill cock. Solder both copper pipes into the coupling. When sweating the copper joints, open the sill cock, agree the torch on i side of the connection and the atomic number 82-free solder wire on the other side. Heat the articulation for 10 seconds until the solder melts and flows effectually the connection. Loosen the pipage hangers along the pipe system to allow maximum move to fit this concluding connexion. Now that you're done installing a frost-proof outdoor faucet, learn how to set a leaking frost-proof faucet.
Footstep 11
Install an anti-siphon valve on an existing sill cock

Depending on how your outdoor water faucet sill cock is currently plumbed, you may find that purchasing and installing an anti-siphon valve (also called a vacuum billow) is all you demand. Don't apply any pipage tape or compound on the sill cock spout threads. To prevent accidental removal or tampering past vandals, all plumbing codes require that vacuum breakers be permanently installed. The breaker y'all buy will accept either a setscrew (with a break-off caput) that grips the spout threads or a feature to brand it hard to unscrew the breaker once information technology'due south installed.
Step 12
If yous take a CPVC supply organisation:
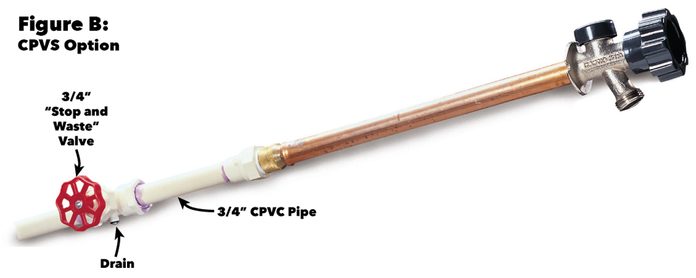
If you take a CPVC supply system (equally shown above in Figure B), omit the dielectric fitting, buy a plastic shutoff valve (with drain) and solvent-weld the pipe and fittings together. Position the valve so that its h2o flow direction pointer points toward the outside wall.
Footstep xiii
More installation tips
For the best results:
- To install freeze-proof water spigot through brick or concrete foundations, it may be necessary to enlarge the existing hole using a drill with a masonry pigsty saw. When drilling the larger pigsty, control drill wobble or "kick-out" by gripping the drill with two easily, keeping the hole saw centered on the old pigsty and running the drill at a lower speed when the saw first enters the hole.
- Apply pipe compound or pipage tape to the male pipe threads everywhere that threaded pipe and fittings join.
- Install new piping level with the existing pipe when they're within a heated space. Install pipes on a downward slope if they drain toward an open sill cock once they go out the heated space.
- Space pipage hangers every 3 ft. to back up the pipe. Utilize copper or plastic hangers on copper pipe.
- After replumbing the sill cock, plow the h2o on for at least two minutes to flush out impurities.
- Uncouple your garden hose from the sill cock before wintertime. If hoses remain attached, frostproof sill cocks (whether open or airtight) may freeze because h2o can't completely drain out of them.
A plumber isn't obliged to tell y'all information technology'southward an easy fix…then check out 12 things your plumber doesn't want you to know.
Originally Published: May 22, 2022

Source: https://www.familyhandyman.com/project/how-to-install-a-frost-proof-outdoor-faucet/
Posted by: simonsdoetianighim.blogspot.com
0 Response to "How To Install An Outside Garden Tap"
Post a Comment